Do you want to learn how to start a blog in 2023?
Hi there, my name is Biswajeet. I’ve been blogging from last 5 years and I love every moment of it.
Blogging helped me to find the way to continues to my lucrative side gig.
In 2015 when I was learning how to create a blog, I spent lot of time to search helpful information.
To save your time, I have created this free step by step guide for beginners to setup blog quickly and easily.
Let’s dive in and get started
Step #1: Select a perfect niche for your blog
To start and run a successful blog you need to select the perfect niche for your blog.
- Pick a niche that you are most interested in and passionate about.
- Pick a niche that has enough audience interest
Once you select the niche, I suggest you to validate it with the 3 step formula mentioned below to obtain a clear idea of the size, competition, and monetization potential for your proposed niche:
- Niche size
- Explore about competition and the competitors
- Monetization potential
Read: How to find a Niche for your blog
Step #2: Choose a blogging platform
Anyone can sign up with a free blogging site or platform such as Blogger.com, WordPress.com, and Tumblr.com
However, if you are serious about blogging, I recommend not to go with the free blogging platform.
In free blogging service, you will have limited monetization, customization, and traffic, and most important that you will have no control over your blog.
And if you want to upgrade, you’ll need to pay more than you should.
The solution for this is to host your own blog yourself (self-hosted blog), which will have no limitations related to your blog content (such as images and videos).
Which Blogging Platform Should I Choose?
Many different blogging platforms that you can choose from. According to Builtwith.com, the most common blogging platform is WordPress.
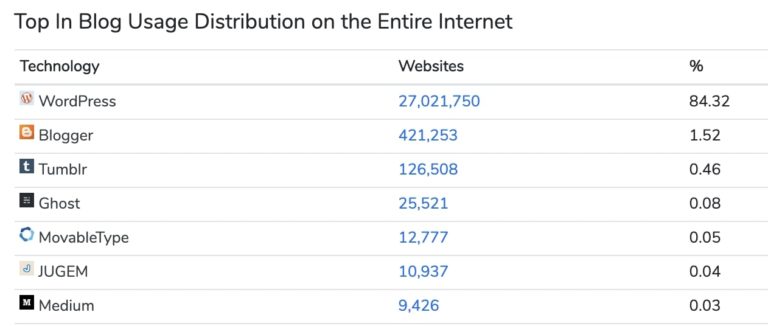
Source: Builtwith.com
Step #3: Pick a Domain Name
Your domain name will be the name by which your blog/business will be known online. Your domain name may be the “.com”, or it may be country (.in, .ca, .us) or niche-specific. The general rule is to go for a “.com” domain.
Step #4. Selecting a Reliable Web Hosting Services
One of the most important decisions you take after choosing the domain to choose a reliable web hosting provider.
The performance of your website depends on the web hosting. The web hosting makes sure your website is available 24/7 to your potential reader.
The wrong web host may cause many problems with your blog like slow website loading, 500 error and so on.
Many hosting companies provides free domain for 1 year when you buy the hosting services. Based on the research I found Bluehost and Siteground is top choice of many blogging experts.
Step #5: Starting a blog on wordpress
This step helps you in how to sign up for web hosting and setting up wordpress blog. For example, I will show you how to setup blog with Bluehost.
- Visit Bluehost.com and then click on “Get Started” button

2. Select your hosting plan for your blog. If you are starting your 1st blog then I recommend you to choose the basic plan. Later, you can upgrade the plan to “Plus” or “Choice Plus” easily once your blog start growing.

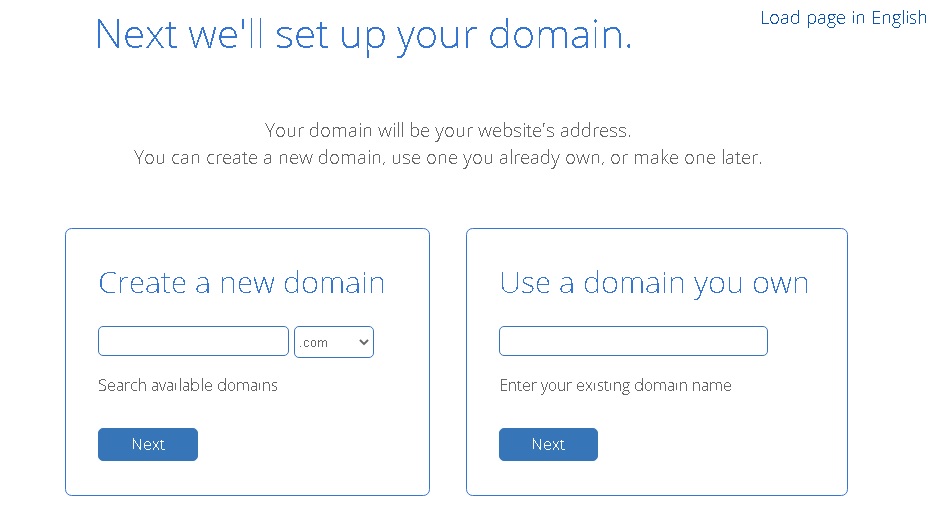
3. In this step you will learn how to setup the domain
If you have the domain already then choose “Use a domain you own” otherwise “Create a new domain” to search domain name something unique and memorable.
After entering the domain name, Bluehost will show you whether it’s available or not. If not, it will provide you with a list of similar names to choose from.
If you can’t find a good name for your blog, Don’t worry , you can skip this step and pick domain later.
4. After you choose your domain name, you will be redirected to Bluehost registration page where you can fill the personal information manually or do signin through Google+
- Add your account information

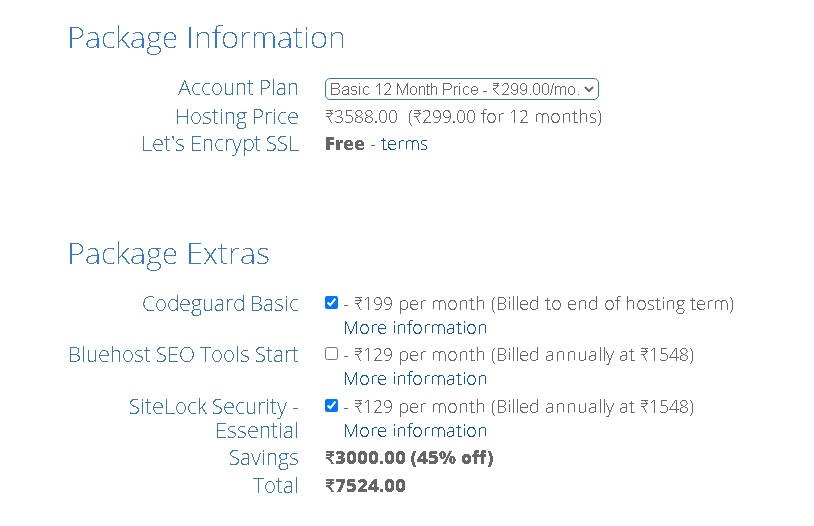
- After filling out the personal information, you will have to select the hosting package from the given option. Bluehost offers 12, 24 and 36 month packages.
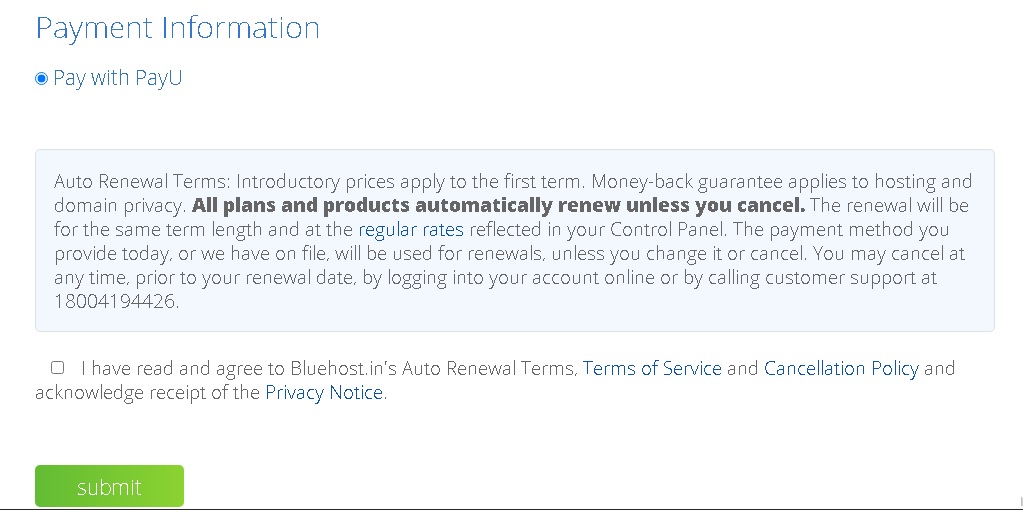
- Enter your payment information & check the box that you have read and agree the TOS (Terms of Service), and click on Submit button. After clicking on Submit button, you will receive payment confirmation email and also receive an email to verify your email address to activate your domain name.
Now, you will have to setup your Bluehost account.
5. Let’s create your account with Bluehost.
Step 1. Click the “Create your account” button.
Step 2. Enter your password and complete the account set up.
Step 3. Your account is ready to go. Click the “Go to login” button.
Step 4. Fill in the fields “Email or Domain Name” and “Password”. You are all set now to start working on creating your blog.
6. Create your WordPress blog with Bluehost
After you log in to the account, Bluehost will offer a 4-step process to help you create a website (blog).
Here are the 4 steps process to setup blog:
Step 1. You will start the process by answering 3 questions: 1) What kind of site are you creating? 2) What type is it? And 3) who are you creating a site for? In my case, I selected: Blog, Personal, Myself.
Step 2. In this step, Bluehost gives you a few more options to add to your website.
Step 3. In this step, you need to setup the name of your blog, tagline, and how comfortable you are with creating websites. Note, you can always change this later.
Step 4. Choose themes given by Bluehost and see the design you like for your website/blog or not. You can always change it and use a different one later.
Once you complete these 4 steps you will be taken to your Bluehost account page. At this point, the WordPress software is installed and your blog structure is set up!
Step 5. You can access the WordPress dashboard from your Bluehost account by clicking the “WordPress” button in the top right corner of your screen.
Step #6: Select a theme and design your blog
The first appearance of your blog needs is design and layout.
Inside the WordPress dashboard, under the “Appearance” Tab, click on “Themes”. WordPress.org having more than five thousand themes, there are premium and free both. Search for free WordPress themes and choose according to your business and see the preview. Look and feel depends on the theme you choose. Your reader will notice the overall appearance first before content
Read: The Best WordPress Themes for 2021
Step #7: Launch your blog
After you click the “Launch My Site” button in your Bluehost account, your blog will go live!
Frequently Asked Questions (FAQs)
- How do bloggers get paid?
- Is it worth starting a blog in 2021?
- What type of blogs make the most money?
- How much does a beginner blogger make?